Masculine Valentine Cards

For Valentine’s Day I made a couple of masculine valentine cards for my boys.  They aren’t too big on the pink and girly options so this is what I came up with:


For the first card I pulled out the HoneyBee stamps Stencil Radiant and used a few shades of memento blue ink.  Then I paired it with 2 die cuts that I stacked up and added to the card.

For my 2nd card I used an embossing folder and then used 2 scraps of patterned papers from my bin of scraps to cut out 2 hearts and attached them to the front of the card.  I kept it pretty plain and simple.  I am entering this one into the Simon Says Stamp Wednesday Challenge: 2 or More Patterned Papers this week.

Posted in HoneyBee Stamps, Valentine's Day | Leave a comment

Valentine cards

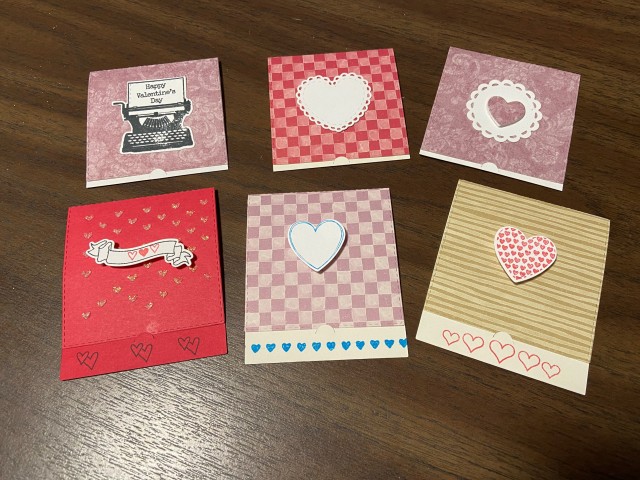
Hi!  Thank you so much for popping over to my blog!  Today I am sharing some valentine cards I created this week for my family.  These cards were inspired by a wonderful tutorial I saw on a blog by Lisa Mensing you can check out the tutorial HERE.  I have really been enjoying her tutorials.  She does a wonderful job showing and sharing things step by step!

I loved piecing scraps of paper together and they really came together quickly!


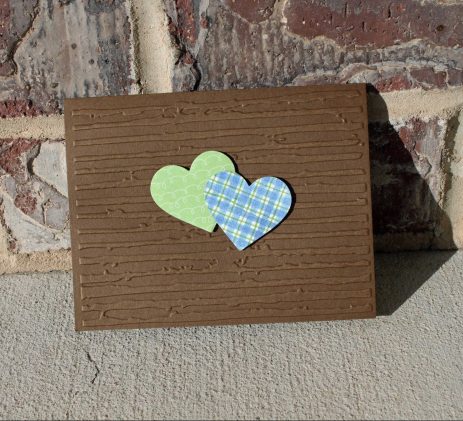
To create these cards I first raided my bucket of scraps I have been collecting FOREVER.  I cut many of these scraps into 1/4 inch strips.  Next I put double stick adhesive on some basic white cardstock and ran that through my Cuttlebug machine using a variety of sized hearts from the Hero Arts Nesting Heart Infinity Dies.  Next peel back the 2nd side of your adhesive and then I started piecing strips of paper across the hearts.  Once all the pieces were laid I ran the hearts through my Cuttblebug a 2nd time to trim the edges smoothly.

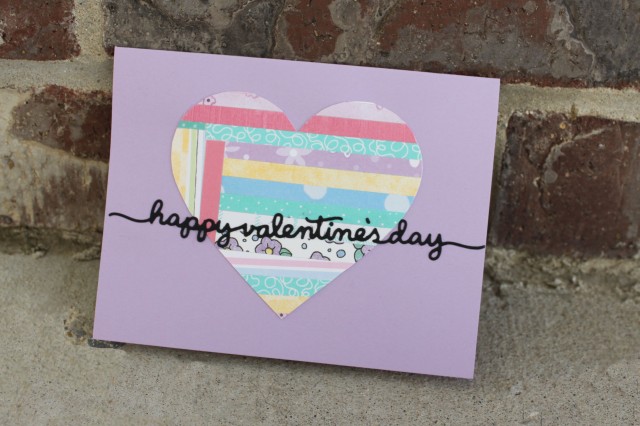
For this card I added a happy valentine’s day sentiment from Lawn Fawn.

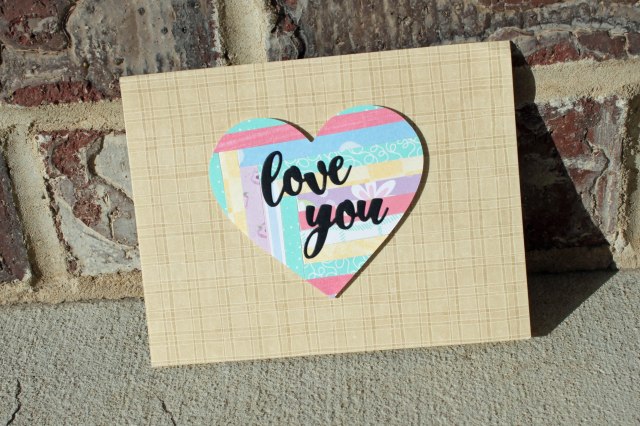
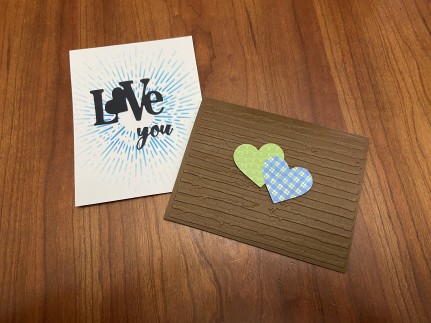
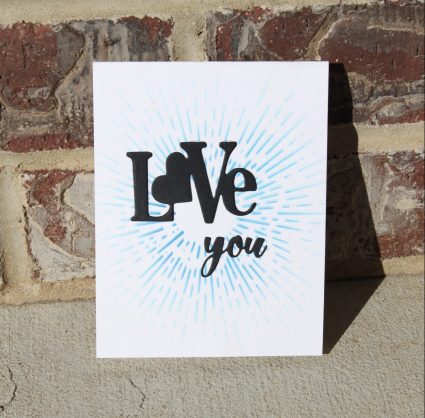
This card I used dies fro My Creative Time called  You Dies #2

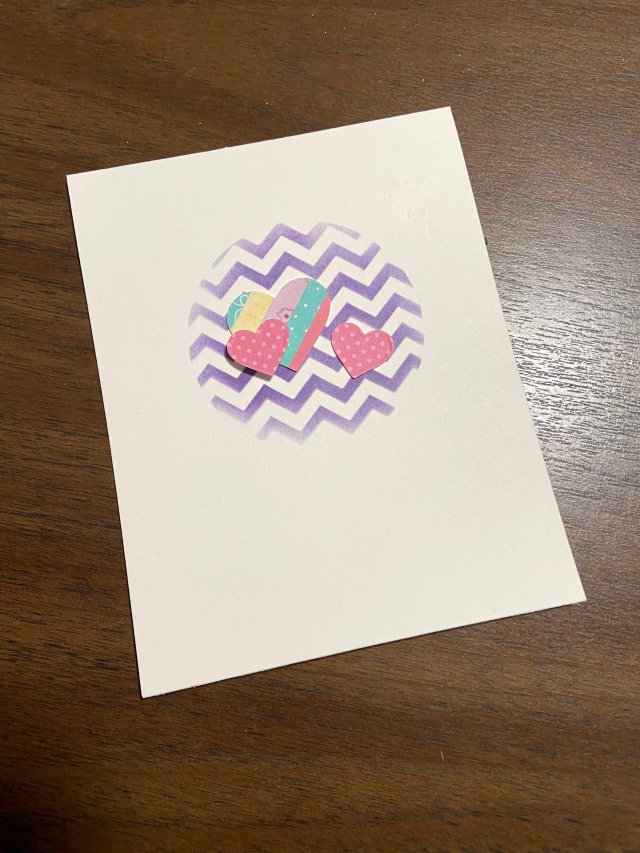
For this card I continued using scraps from my stash.  I then used the Picket Fence Studio Circle Stencil (2.5 I think) and on top of that layered a chevron stencil that I believe came from Craftin Desert Diva’s. to add the fun circle to frame the hearts.


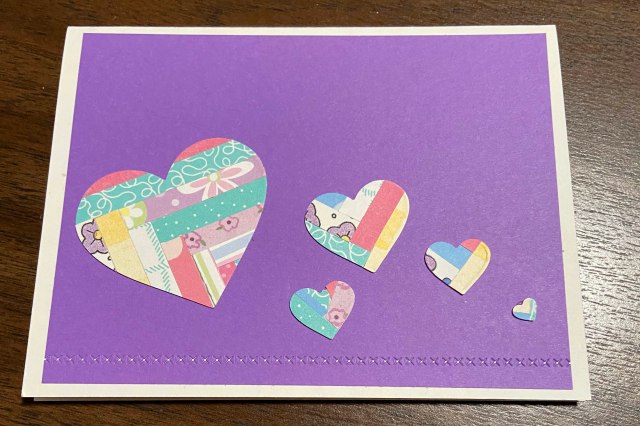
Last but not lease I created a card of many hearts.  To add accent and interest I added a stitched X border from Lawn Fawn.

I am entering several of these cards into the Simon Says Stamp Wed. Challenge: Two Or More Patterned papers.

Thanks so much for taking the time to stop by my blog!  I hope you have a wonderful day!


Posted in Craftin Desert Diva, Hero Arts, My Creative Time, Picket Fence Studios, Valentine's Day | Leave a comment

Love Notes

Hi!  Thank you so much for popping over to visit my blog!  Today I am sharing a quick picture of some love notes my daughter and I have been creating.  Inside we are writing characteristics we love about people we know.  It is a family valentine tradition to show our love to those around us.

The Just a Note die from My Creative Time makes these a breeze to put together!  We also tried out Nuvo Glimmer Paste for the fist time.  So much fun!

We are sharing our projects on the Simon Says Stamp Wednesday Challenge: With Love and  Virginia’s Show and Share !


Supplies:

  • Ink: Memento: Tuxedo Black
  • My Creative Time: Heart Doily Dies
  • My Creative Time: Once Upon A time
  • My Creative Time: Mini Chalboard
  • Stampin’ Up: Hearts a Flutter
  • Simon Says Stamp Stencil: Falling Hearts
  • Nuvo Glimmer Paste (Moonstone I think)
  • Misc papers
Posted in Cards, Memento, My Creative Time, Simon Says Stamp, Stampin'Up!, Valentine's Day | 2 Comments

Christmas Ornaments

Hi!  Thanks for coming over to check out my blog!  Recently when we had a craft room overhaul we discovered a long lost package of Stampin’ Up Simply Pressed Clay.  My son needed to make dinosaur impressions for Scouts so most of it went to that.  There was just enough left though for my daughter and I to try our hand at making a few Christmas ornaments!

group_1

To create the ornaments we rolled out the clay and cut it very scientifically with a cup 🙂  Next we used a straw to cut the small hole to string the ornament with later.  Last but not least we stamped images into the clay.  It was a process to learn how much pressure to use.  I hope to go back again sometime and try this again.  I think round 2 will have even better results.

IMG_1438_manger

For my stamps I knew immediately I wanted to use the Taylored Expressions Let us Adore Him stamp.  I love the beauty and simplicity of this little manger.  For the text on the 2nd ornament I used the stamp set Christ is Born by Jaded Blossom Stamps.

IMG_1433

I love how well the 2 styles of ornaments go together!

IMG_1447


I am entering my ornaments into the Simon Says Stamp Monday Challenge: Let’s Get Ready for Christmas

Posted in Christmas, Jaded Blossom, Taylored Expressions, Uncategorized | Leave a comment

Sweet and Simple

I was inspired by a video I saw recently (I really wish I could remember where so I could give them credit!) that did white heat embossing on to vellum.  When I saw the video I knew just the stamp set I had that I wanted to try this with.  It was the Honey Bee Stamps Spring Peony Clear stamp set.  It is a beautiful collection of peony flowers!

I used Versamark ink on a strip of Hero Arts vellum.  Then I used Hero arts white embossing powder and heat set it.

Next I used the sentiment from the Pretty Pink Posh – Encouraging Greetings to complete this sweet and simple card.

praying


Thank you so much for taking the time to come visit my blog!  I hope you have a wonderful day!

Posted in Uncategorized | Leave a comment

Trying New Things

Hello!  Thank you for stopping by!

A little bit ago I tried out something new by creating a bunch of water colored backgrounds.  I experimented on different papers and water coloring in general with my kiddo’s.  It was a lot of fun.  This weekend I took it a step farther by creating a new card with one of those backgrounds I still had hanging around.

lions_2

I tried out a little stamp masking and then some coloring.  I simply used colored pencils – nothing fancy at all. Parts of this coloring I’m pleased with parts not so much but all in all I feel like the card turned out OK and I learned a bit so I’m going to count it as a win.  Plus there is only one place to go from here and that’s up! 🙂

lion_3

For the stamping I used a stamp set by Studio Katia called Birthday Lions.   To add a little sparkle to the balloons I used 2 different Wink of Stella pens  clear on the 1st and 3rd balloons and a red Wink of Stella for the middle one.

lion_1

I am sharing this with the Simon Says STAMPtember Studio Katia link.

Posted in Birthday, Cards, Studio Katia, Uncategorized | Leave a comment

Fall Hope

The leaves are starting to change colors on the mountains by where I live and it is beautiful.  Following that thought I decided to create another Hope card with fall colors and here is the result:

Concord & 9th: Hope Stamp Set

Hero Arts: Silver embossing powder and vellum


I am adding this to the Simon Says Stamp Wednesday Challenge: Anything Goes

I am also adding this to the STAMPtember celebration linky for Concord and 9th.

Posted in Cards, Concord & 9th, Hero Arts, Misc | Leave a comment

Reindeer Fun

Hi!  Thank you for coming to see my blog!

For this card I started by blending a circle using the Picket Fence Studios 2 1/2 inch Blending stencil.  I used a combination of a couple of green inks in my stash.  Next I stamped and colored one of the cute reindeer from the Picket Fence Studios Santa’s Sleigh Ride stamp set.  Then I attempted to fussy cut the image.  So grateful I learned the tip to color the edges black after you cut out a stamp!  I adhered the reindeer using pop dots to my green circle.   Next up was the sentiment it also comes from the Santa’s Sleigh Ride set.  At this point I was going to adhere it to my card base but decided to make one more change so I ran it through my die cutting machine using the My Favorite Things Stitched Mod Rectangle Stax Die-namic.

I am sharing this with the Simon Says Stamp STAMPTEMBER: Picket Fence Studio  linky.

Posted in Christmas, Picket Fence Studios | Leave a comment

1 stamp 4 cards

Hi!  Thanks for taking the time to come visit my blog!  I have been inspired lately by the videos and blogs I have seen about making multiple cards and trying out different ways for the same stamp set.  Following that thinking I created this little collection of cards.  They all centered on the Picket Fence Studio’s  Santa’s Sleigh Ride Stamp set.

Reindeer Card #1

This card was stamped in Taylored Expressions Ink: Oreo.  The velum is from Hero Arts and I used Hero Arts Silver embossing powder.  The Merry Christmas stamp is from my collection and I can’t remember who it is by.

Reindeer Card #2

On this card I used VersaMark with Hero Arts Silver embossing powder.  The Merry Christmas is from a stamp set by Peachy Keen Bell Ringer Elves Stamp Set.

Reindeer Card #3

For this card in addition to the Picket Fence Santa’s Sleigh Ride stamp I used Versamark ink and Hero arts white embossing powder.  I also used a Stampin’ Up stitched oval die for my sentiment and the sentiment is from an unknown Christmas set I have.

Reindeer Card #4

Last but not least I had a slight mishap on my panel I was trying with just Versamark hoping to leave a watermark for the reindeer.  Rather than scrap the whole thing I trimmed the panel and attached it to a shiny silver paper I had in my stash.  Next I added a Merry Christmas sentiment stamped in Momento Ink – Cottage Ivy to an oval I had die cut from a Stampin’ Up stitched oval set.

Thanks again for taking the time to visit my blog I hope you have a wonderful day!


I am entering these into the following Card Challenges:

Simon Says Stamp Wednesday Challenge:  Anything Goes

Simon Says Stamp STAMPtember: Picket Fence Studios


Posted in Cards, Christmas, Hero Arts, Memento, Picket Fence Studios, Stampin'Up! | Leave a comment

Hope

I created a few cards centering around the Concord and 9th Hope Stamp Set and Dies.

For my first card I used the flowers from the set to create a beautiful background.  Then I stamped the sentiment on top of that and mounted it onto a card for a simple 1 layer card.

For my next card I used the Concord and 9th Barnwood Background stamp to created a soft background by double stamping it with versamark ink.   Next I stamped my sentiment from the Concord and 9th Hope Stamp set.  Then I added a flower I stamped and fussy cut before popping it up on the bottom left corner of the card.

Last but not least I used the Barnwood Background stamp again with versamark ink to created the beautiful background.  I then added the die cut created using the Hope die and frame.  Last but not least I added another sentiment from the Hope Stamp Set.

Thank you for taking the time to visit my blog!

I am entering the 2nd and 3rd cards into the Simon Says Stamp Monday Challenge: S is for . . . I am saying Simple.  I chose to keep these cards very simple in my approach.

I am also entering all 3 of these cards into the Simon Says Stamp Wednesday Challenge: Anything goes.  As well as the Concord and 9th social Media 4th birthday celebration.

Posted in Birthday, Cards, Concord & 9th, Misc | Leave a comment